Why Metal Roof Installation Is a Smart Investment for Your Home
Metal roof installation is a proven way to protect your home for decades while cutting energy costs and boosting property value. With a lifespan of 40-70 years, metal roofs outlast traditional asphalt shingles by decades, resist harsh weather, and improve energy efficiency.
However, installing a metal roof requires precise measurements, proper fastening, and careful attention to detail. A mistake can lead to leaks, panel damage, or voided warranties. While experienced DIYers can tackle simple projects like sheds or garages, most residential installations benefit from professional expertise.
This guide walks you through the entire process, from preparation to final inspection. I’m Jason Hedtler, owner of Roof Experts LLC, and I’ll share my hands-on experience to help you understand the possibilities and know when to call in the pros for the best long-term results.
Key Steps for Metal Roof Installation:
Prepare the roof deck: Remove old materials, inspect for damage, and ensure a minimum 3:12 pitch.
Install underlayment: Apply synthetic underlayment with proper overlap.
Add drip edge and closure strips: Protect eaves and prevent water infiltration.
Install metal panels: Align, overlap, and fasten with self-tapping screws.
Install flashing: Seal valleys, chimneys, and other penetrations.
Add ridge caps: Complete the roof peak with proper ventilation and sealing.
Before You Begin: Planning, Safety, and Materials
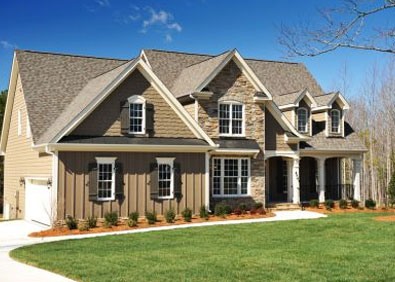
Why Choose a Metal Roof?
Homeowners choose metal roofs for compelling reasons. Longevity is the biggest factor, with a lifespan of 40-70 years, compared to 15-20 for asphalt. This durability means they stand up to high winds, heavy snow, and hail while resisting moss and mold. Metal roofs are also energy-efficient, reflecting solar heat to lower summer cooling costs. Made from recycled content and 100% recyclable, they are a sustainable choice that can also increase your home’s resale value.
Feature
Metal Roof
Asphalt Shingle Roof
Lifespan
40-70 years
15-20 years
Cost
2-3 times more expensive than asphalt
Lower initial cost
Maintenance
Low; occasional inspection
Moderate; regular cleaning, shingle repair
Energy Savings
High; reflects heat
Low; absorbs heat
Durability
Excellent; wind, hail, fire resistant
Good; susceptible to wind, moss growth
Choosing Your Metal Material
Steel: The most common choice, offering a great balance of durability and affordability. It’s typically coated for corrosion resistance and color.
Aluminum: More expensive but highly resistant to corrosion, making it ideal for coastal areas like Bourne or Wareham where salt air is a factor.
Copper & Zinc: Premium, long-lasting options that develop a natural patina over time. They are the most expensive and are often used for architectural highlights.
Understanding Panel Profiles
Corrugated panels: Classic wavy panels that are cost-effective and straightforward to install, making them a good choice for DIY projects on simple structures.
Standing seam: Features clean, vertical lines for a modern look. This system is exceptionally durable but requires specialized tools like seaming pliers and expertise to install correctly.
Metal shingles: Offer the durability of metal with the traditional appearance of asphalt shingles.
Climate Considerations for Our Region
In Massachusetts and Rhode Island, your metal roof installation must account for snow, ice, and high winds. Metal roofs shed snow well, but you may need snow guards to prevent large sheets from sliding off. Proper panel setbacks and wide valley flashing help prevent ice dams. The roofing system must also meet local UL ratings for wind uplift resistance, which dictates fastener spacing.
Essential Tools and Materials for Metal Roof Installation
Having the right equipment is crucial for a safe and successful installation.
Measuring & Marking: Tape measure, speed square, and chalk line.
Cutting Tools: Metal snips (left and right-cutting), a nibbler or double cut shears for clean cuts. A circular saw with a metal-cutting blade can be used sparingly.
Fastening Tools: A torque-controlled screw gun is recommended over an impact driver to avoid damaging screws and washers. You’ll also need a riveter.
Materials:
Metal panels, flashing, and ridge caps
Underlayment: High-quality synthetic underlayment is preferred. Use a self-adhering ice-and-water membrane at eaves and in valleys.
Fasteners: Self-tapping roofing screws with integrated rubber washers.
Sealant: High-quality exterior-grade caulk or butyl tape.
Closure strips: Foam or neoprene strips to seal gaps at the eaves and ridge.
For more details, consult a resource like the Metal Roof Installation Manual.
Don’t Skip the Permits
Most metal roof installation projects require a building permit. Local codes in Massachusetts and Rhode Island dictate minimum roof slope (typically 3:12), fastener spacing, and underlayment requirements. Permits and inspections ensure your roof is safe and compliant, which is essential for insurance and future home sales. If you’re weighing the costs, you can explore the average cost of new metal roof installation. For professional help, you can find metal roof builders near you.
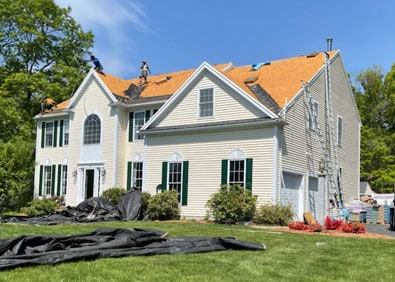
The Step-by-Step Metal Roof Installation Process
With planning complete, it’s time for the metal roof installation. Precision and patience during these steps are key to a long-lasting, weather-tight roof.
Roof Deck Preparation and Underlayment
A solid, clean roof deck is the foundation for your new roof.
Prepare the Deck: Remove all old roofing materials down to the bare wood sheathing. A complete tear-off is recommended over a “recover” to expose and address any hidden damage.
Inspect and Repair: Carefully inspect the entire deck for rot, warping, or soft spots. Cut out and replace any damaged sections of sheathing. Sweep the deck completely clean of all debris and old nails.
Confirm Pitch: Ensure your roof has at least a 3:12 slope (3 inches of rise for every 12 inches of run) for proper water drainage. Low-slope roofs may require special sealing techniques per the manufacturer’s guidelines.
Install Underlayment: Roll out a high-quality synthetic underlayment horizontally, starting from the eaves and working up to the ridge. Overlap each row by at least 3 inches on the sides and 6 inches at the ends. In ice dam-prone areas, apply a self-adhering ice-and-water membrane along the eaves and in valleys. Secure the underlayment smoothly with cap nails.
Install Drip Edge: Attach the drip edge along the eaves before the underlayment, and over the underlayment on the rake edges. Overlap sections by an inch and seal the seams.
Installing Panels, Flashing, and Ridge Caps
This stage requires careful alignment and fastening to create a waterproof system.
Panel Installation
Measure and Cut: Measure each roof section and order about 10% extra material for waste. Use metal snips or a nibbler for clean cuts, and immediately clean up all metal shavings to prevent scratches and rust.
Align the First Panel: Snap a square chalk line as a guide. Position the first panel to overhang the eave by about 1 inch (check manufacturer specs) to direct water into the gutter.
Overlap and Fasten: Overlap subsequent panels according to the profile, typically by one full rib or 1.5 to 2 inches. Apply a bead of butyl tape between overlapping seams for extra weather protection.
Secure with Screws: Use self-tapping screws with rubber washers, driving them into the flat part of the panel, not the high rib. Space screws every 18 to 24 inches into the roof structure. Drive the screw until the washer is slightly compressed—do not over-tighten or under-tighten.
Flashing and Finishing
Flashing: This is critical for preventing leaks. Install valley flashing over an extra layer of underlayment. Use step flashing around chimneys and follow the manufacturer’s kit for skylights. All flashing must be integrated with the panels and sealed with caulk or butyl tape. For more on this, see our guide on new roof installation costs and considerations.
Closure Strips: Install foam closure strips at the eaves and ridge to block pests, debris, and wind-driven rain.
Ridge Caps: Place the ridge cap over the closure strips at the peak. Secure it with 2-inch screws through the ribs into the roof deck below, overlapping sections by at least 4 inches and sealing the laps.
For detailed technical specifications, refer to a guide like the Metal Roof Installation Manual.
Final Steps and Long-Term Care
With the main installation complete, the final steps involve cleanup, inspection, and understanding long-term care to ensure your roof lasts for decades.
Common Mistakes in DIY Metal Roof Installation
Metal roof installation is precise work where small errors can cause major problems. Avoid these common DIY mistakes:
Improper Fastening: Over-tightening screws damages the washer’s seal, while under-tightening leaves a gap for water. Screws must also be driven straight and in the flat part of the panel.
Incorrect Panel Overlap: Failing to overlap panels correctly (typically 1.5-2 inches or one full rib) creates a direct path for water infiltration.
Insufficient Sealing: Forgetting to apply butyl tape or sealant at all overlaps, flashing, and penetrations is a primary cause of leaks.
Poor Flashing Technique: Flashing around valleys, chimneys, and skylights is complex. Incorrect installation is one of the most common and severe sources of roof leaks.
Skipping Underlayment: The underlayment is a critical secondary moisture barrier that protects your roof deck from condensation and incidental leaks. It is almost always required for warranty coverage.
Ignoring Thermal Movement: Metal expands and contracts. Fastening panels too tightly without allowing for this movement can cause buckling and damage over time.
Unsafe Work Practices: Metal roofs are slippery. Working at heights without a proper safety harness, non-slip boots, and other safety gear is extremely dangerous.
Maintenance and When to Hire a Professional
A key benefit of metal roofing is its low maintenance, but it’s not “no maintenance.”
Long-Term Maintenance Tips:
Inspect Annually: At least once a year (spring and fall are best), check for loose fasteners, damaged sealant, or debris accumulation.
Clean Debris: Clear leaves and branches from valleys and around chimneys to ensure proper water flow.
Check Fasteners: Gently tighten any screws that may have loosened over time, being careful not to over-tighten.
Wash Gently: Use a garden hose to rinse off dirt. For stubborn grime, use a soft brush with a mild detergent and rinse thoroughly. Avoid abrasive cleaners.
DIY vs. Hiring a Professional
While a simple, single-plane roof on a garage or shed can be a manageable DIY project for an experienced person, most residential metal roof installations are best left to professionals.
Consider hiring a pro if your project involves:
Steep Roof Pitches or Complex Designs: Professionals have the required safety equipment and experience to work on steep or multi-faceted roofs with dormers, hips, and valleys.
Warranty Protection: A professional installation from a certified contractor ensures your manufacturer and workmanship warranties are valid. DIY installations often void these protections.
Specialized Tools and Expertise: Installing systems like standing seam requires expensive, specialized tools and knowledge that most homeowners don’t possess.
Permits and Code Compliance: A professional contractor handles all necessary permits and inspections, ensuring your roof meets local building codes in towns like Bellingham, Franklin, or Mansfield.
At Roof Experts, we have over 20 years of experience providing high-quality workmanship and superior value to homeowners across Massachusetts and Rhode Island. If you’re considering a metal roof, we can help.
We specialize in professional new roof installations tailored to meet the unique needs of each homeowner in the Bellingham, MA area. Our expert team utilizes the latest materials and techniques to ensure your new roof not only looks great but also provides superior protection for your home. With over 20 years of industry experience, we commit to excellence in every project, guaranteeing a durable and aesthetically pleasing roof that enhances the value and safety of your property. Roof Experts is dedicated to honesty, quality, and satisfaction, making us the trusted choice for roofing solutions.
Whether due to age or weather damage, Roof Experts provides reliable roof replacement services designed to restore the integrity and appearance of your home. Operating out of our base at 235 Maple St Suite 8, Bellingham, MA, our skilled roofers carefully assess your current roof to recommend the best solutions. We prioritize high-quality materials and meticulous craftsmanship to ensure your new roof stands the test of time, while maintaining our commitment to exceptional customer service. Every project is handled with care and precision.
Roof Experts understands the urgency and importance of prompt roof repairs. Serving homeowners in both Franklin and Bellingham, MA, our experienced team is equipped to handle a wide range of roof repair needs, from minor leaks to significant damage. We focus on delivering quick, effective solutions that prevent further damage and protect your home. Trust Roof Experts's two decades of expertise to provide dependable repairs that ensure your roof remains in optimal condition. Customers know they can rely on us for fast service and strong results.