
Asphalt roof installation is the most common roofing project in the United States, covering over 80% of all residential homes. It’s a popular choice for its balance of cost, durability, and aesthetic appeal. Here’s a quick overview:
Key Steps for Installing Asphalt Shingles:
Costs: Expect to spend $5,840 to $10,100 for a complete replacement, with labor making up about 60% of the total.
Lifespan: A properly installed asphalt roof lasts 20-30 years, depending on the shingle type.
Installing a new asphalt roof boosts your home’s energy efficiency, improves curb appeal, and provides critical protection from the elements. As Jason Hedtler, owner of Roof Experts LLC in Bellingham, MA, I’ve seen how proper installation techniques make the difference between a roof that fails early and one that protects your home for decades. My team and I have guided countless homeowners in Norfolk and Plymouth Counties through successful asphalt roof installation projects, ensuring their investment is built to last.

Every successful asphalt roof installation follows a precise sequence of steps. Understanding this process helps ensure your new roof will protect your home for decades to come.
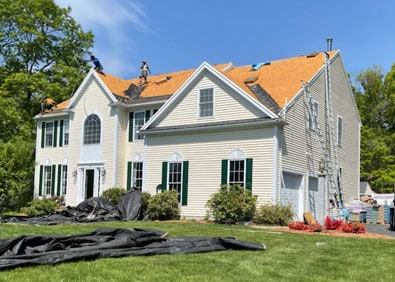
Proper groundwork is essential for a smooth, safe, and successful installation.
Roofing is dangerous. Use proper personal protective equipment (a sturdy ladder, non-slip shoes, safety glasses, gloves, and a safety harness anchored securely). Clear the area around your home and notify neighbors. Never work in rain, high winds, or extreme temperatures.
To calculate your needs, measure the total area of your roof and divide by 100 to determine the number of “squares” you need (one square = 100 sq. ft.). Always add 10-20% extra for waste, cuts, and starter shingles. Don’t forget to order underlayment, drip edge, flashing, nails, and ridge caps.
Labor typically accounts for 60% of the total asphalt roof installation cost. Other factors that influence the price include the shingle type you choose, the size and complexity (pitch, dormers, valleys) of your roof, the cost of a full tear-off, and any necessary repairs to the underlying roof deck.
Look for these warning signs:
Proper attic ventilation is critical for your roof’s longevity. A balanced vent system lets trapped heat and moisture escape, preventing premature shingle aging, wood rot, and ice dams. A well-ventilated attic can extend your roof’s life by up to 10 years.
The ideal temperature for asphalt roof installation is between 40°F and 85°F. In this range, shingles are flexible and their adhesive strips seal properly. Cold weather can make shingles brittle and prevent sealing, while extreme heat can make them soft and easily damaged by foot traffic.
A solid foundation is key to a long-lasting roof.
A complete tear-off is always recommended. This allows a thorough inspection of the roof sheathing (deck) for rot or damage. Replace any compromised boards to ensure the new shingles have a solid surface to anchor to and to prevent excess weight on your roof.
Before any new materials are installed, the entire roof deck must be swept clean of all debris and nails. This ensures the underlayment and shingles will lay flat and smooth.

These hidden layers provide critical secondary protection against water intrusion.
Precision during shingle installation is what creates a beautiful, watertight finish.
Install a dedicated starter course along the eaves and rakes. This prevents wind uplift and provides a sealing point for the first row of shingles. When laying subsequent courses, you must stagger the vertical joints to prevent water from penetrating. A common technique is the 6-inch offset method. Use chalk lines to ensure every course is perfectly straight. For a visual guide, you can watch a how-to video on YouTube.
Proper nailing is critical for wind resistance and your warranty. Use four corrosion-resistant roofing nails per shingle, or six nails in high-wind areas. Nails must be long enough to penetrate at least 3/4 inch into the roof deck. Drive nails straight and flush with the shingle surface—overdriving will cut the shingle, while underdriving leaves the nail head exposed to cause a leak.

Most roof leaks occur where the shingle field is interrupted. This is where professional expertise shines.
Valleys channel large amounts of water and require robust protection. An open valley uses exposed metal flashing for maximum water-shedding, while a closed valley covers the flashing with shingles for a more uniform look. We often recommend open valleys for their superior long-term performance, especially in areas with heavy snow.

Proper flashing is your roof’s defense against leaks. Chimneys require a system of interwoven step flashing and counter-flashing. Vents and plumbing stacks use pre-formed boot flashings sealed with roofing cement. Walls and skylights also require integrated step flashing to divert water safely down the roof. You can learn how to flash around plumbing stacks and attic vents to prevent leaks.
The final touches ensure a polished look and complete protection.
Now that you understand the steps of an asphalt roof installation, you can appreciate the precision required. While some homeowners are avid DIYers, roofing is one area where professional expertise provides invaluable peace of mind.
DIY roofing is physically demanding and dangerous due to fall risks. Technical mistakes in nailing or flashing can cause costly leaks and void manufacturer warranties, which often require professional installation.
Hiring a professional contractor like Roof Experts is an investment in quality and security. Our experience matters; we know how to build a roofing system that withstands New England’s harsh weather.
Here’s what sets our workmanship apart:
Your roof is your home’s first line of defense. It’s not the place to learn as you go. Whether you’re in Bellingham, Carver, Duxbury, or anywhere else in Norfolk and Plymouth County, we’re here to help. We offer free estimates, honest advice, and the exceptional customer service that has earned us our reputation.
If you’re considering an asphalt roof installation, let’s talk. Find a local roofing professional in your area and find why so many homeowners trust Roof Experts with their most important investment.
Roof Installations
Roof Replacements

Roof Repairs